Robinhood VS Webull for Beginners
Last reviewed: Aug 2025 · Independence: No affiliate links, no payment from either broker · For education, not advice
My Promise & How I Test (The Investibuddy Method)
I used both apps daily for 30 days, placed small mwaht arket and limit orders in regular hours, logged quote vs fill (bid, ask, midpoint, fill), and re-checked settings in each help center. Screenshots saved; private info redacted.
I’m not an expert. I’m a fellow beginner who tests with small amounts, practices risky features in a simulator first, and double-checks details in official docs. I don’t take referral fees for this comparison. When something confuses me, I say so and translate it into plain English. I reviewed each app’s public help pages the week of August 5, 2025 and saved screenshots. My promise: clear explanations, beginner-safe steps, and no hype. If I learn something new, I’ll update this and explain what changed.
Last reviewed: August 9, 2025.
Part 1: Set-Up & What You Get
Hello, Investibuddy here again!! Today I will go overon Robinhood vs Webull for beginners so our first trades aren’t guesswork. In this guide, I compare fees, bid-ask spread fills/price improvement, cash APY, and everyday usability so a first-time investor can pick the right fit without hype.
You Are Here: Road Map (Stop 1 of 2)
- Warm-up: a quick Pre-Quiz + Glossary so we’re speaking the same language.
- Core tour: what “free” really means, who each app fits, what you can buy, and why paper trading is a low-stress way to practice.
- Next time (Part 2): the real costs (spreads, execution, fees), paid tiers & APY, margin basics, regulator notes, common mistakes, and a calm decision checklist + FAQ.
Author’s Note (how I keep this unbiased)
I don’t take referral links or sponsorships for this comparison. I test apps with tiny real trades, practice risky features in a simulator first, and double-check claims in official docs. If I get something wrong and learn better, I’ll update it.
I’ll never tell you to use margin, options, or short selling until you can explain the risk in one plain sentence.
If you want a wider foundation first, check out Best Broker for Beginners: Start Smart, Invest Confidently and then come back.
Today I’m zooming in on Robinhood vs. Webull for Beginners.
I felt excited, and a bit overwhelmed. I assumed “commission-free” meant “nothing else to think about.”
A week later I realized the price on the screen isn’t the whole story.
Small choices like order type and when we trade quietly shape results.
Let’s sort that out calmly, together.
Short answer: For most beginner investors, Robinhood suits a simple, fractional, long-term start, while Webull suits hands-on learners who want paper trading and advanced order types from day one. If you’re hunting for the best broker for beginners, this guide keeps it practical.
According to the SEC’s Investor.gov, zero commission doesn’t erase trading costs. Spreads and execution still shape what you actually pay.
Paper trading isn’t about getting a score; it’s about learning the buttons and, more importantly, my own emotional triggers before real money is on the line.
Robinhood vs Webull for Beginners: Quick Quiz!
Answer these 3 questions. Keep your A’s and B’s. we’ll use your result as a guide later.
- When you open an investing app, what do you want to feel first?
A) Calm and simple. I want the basics and a clear path.
B) Curious and in control. I want tools, charts, and settings to explore. - How do you prefer to learn?
A) Start small with dollars and a clean screen; add more later.
B) Practice first in a simulator, then try small live trades with advanced orders. - What’s your comfort with complex features (short selling, conditional orders) right now?
A) Low. I’d rather keep it simple while I build habits.
B) Medium to high. I’m okay learning new controls if I can test safely.
Your Result
- Mostly A’s → Clarity-First Starter (clean layout, simple choices, small steps).
- Mostly B’s → Tools-First Explorer (hands-on learning, practice modes, flexible controls).
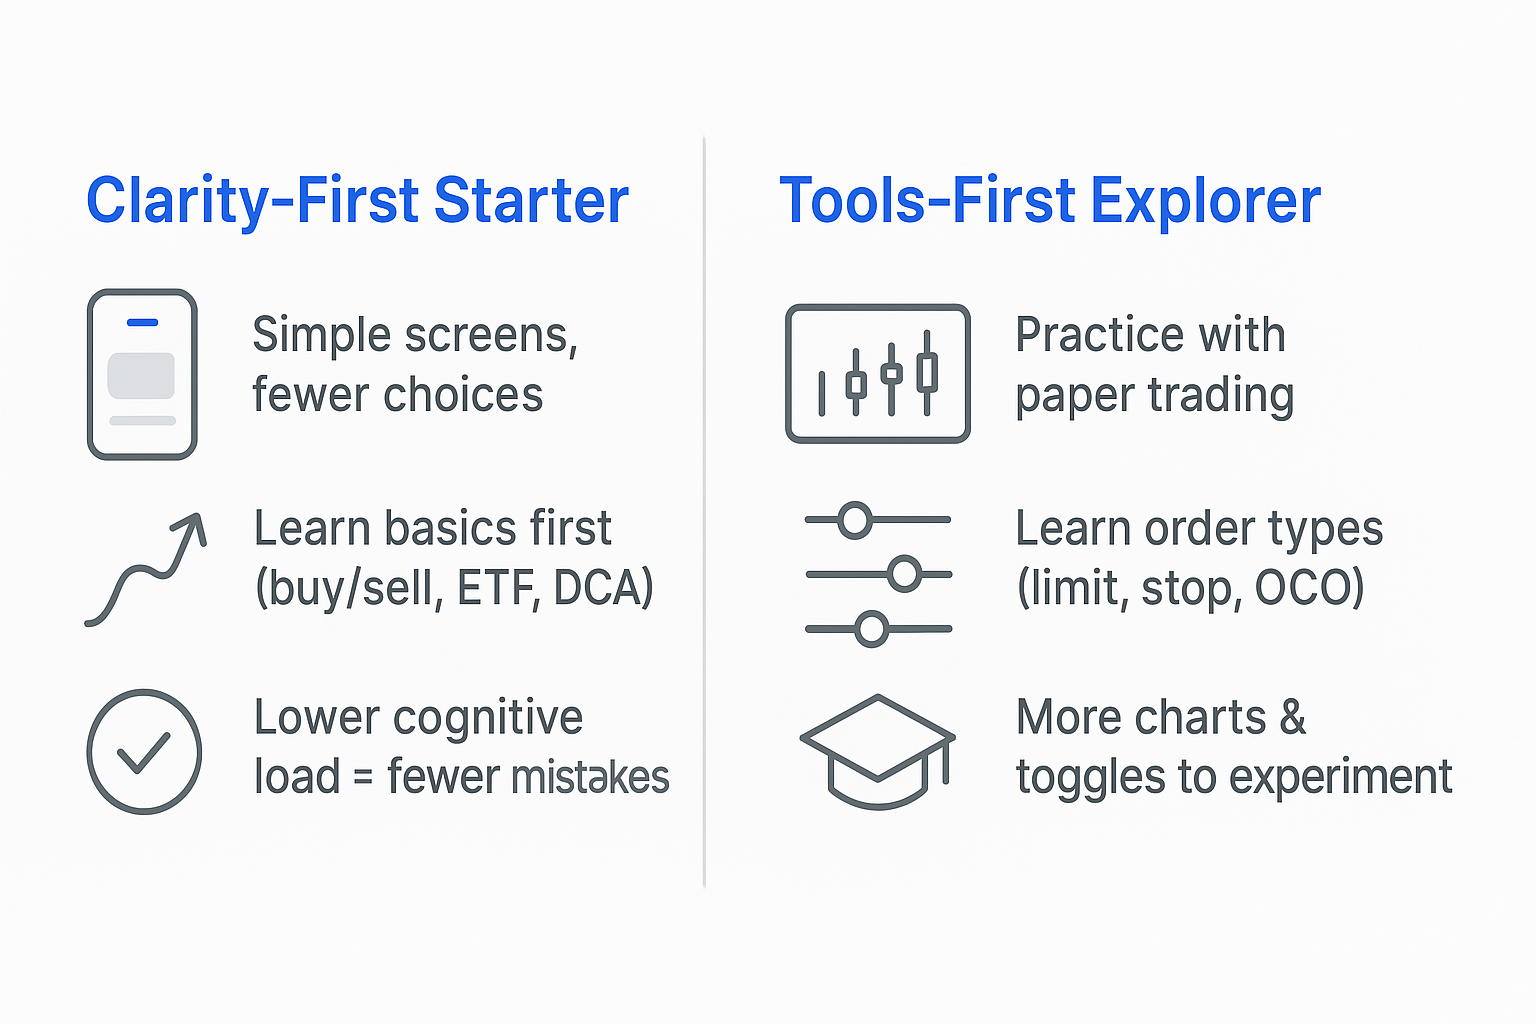
How to use your result: Keep “Clarity-First” or “Tools-First” in mind as you read. whenever you see a Starter, choose the version that matches your style.
Why this matters: Everything below is a Robinhood vs. Webull for beginners comparison through your lens. Clarity-First or Tools-First so you’ll see exactly which app fits your style and what to do next.
(When I first started, I was firmly a ‘Clarity-First’ investor. My first trade was a simple $10 fractional share of an ETF on Robinhood. But after a few months of learning, I found myself wanting more tools, which led me to explore Webull’s paper trading. This guide is a result of that personal evolution..)
Pro tip: Keep this page open while you explore your app; whenever a term pops up, jump back here, skim the Glossary, and then apply it immediately.
Glossary
Must-Know Now (read in 2 minutes)
- Commission: The visible fee to place a trade. Many apps show $0, but other costs still apply.
Example: You pay $0, yet spreads and tiny regulatory fees still affect your total. - Spread: The gap between bid and ask; a built-in cost. Wider gap = more you give up at entry/exit.
Picture it: A currency counter’s buy vs. sell rates. The gap is their profit. - Execution quality: How your fill price compares to the best available price at that moment.
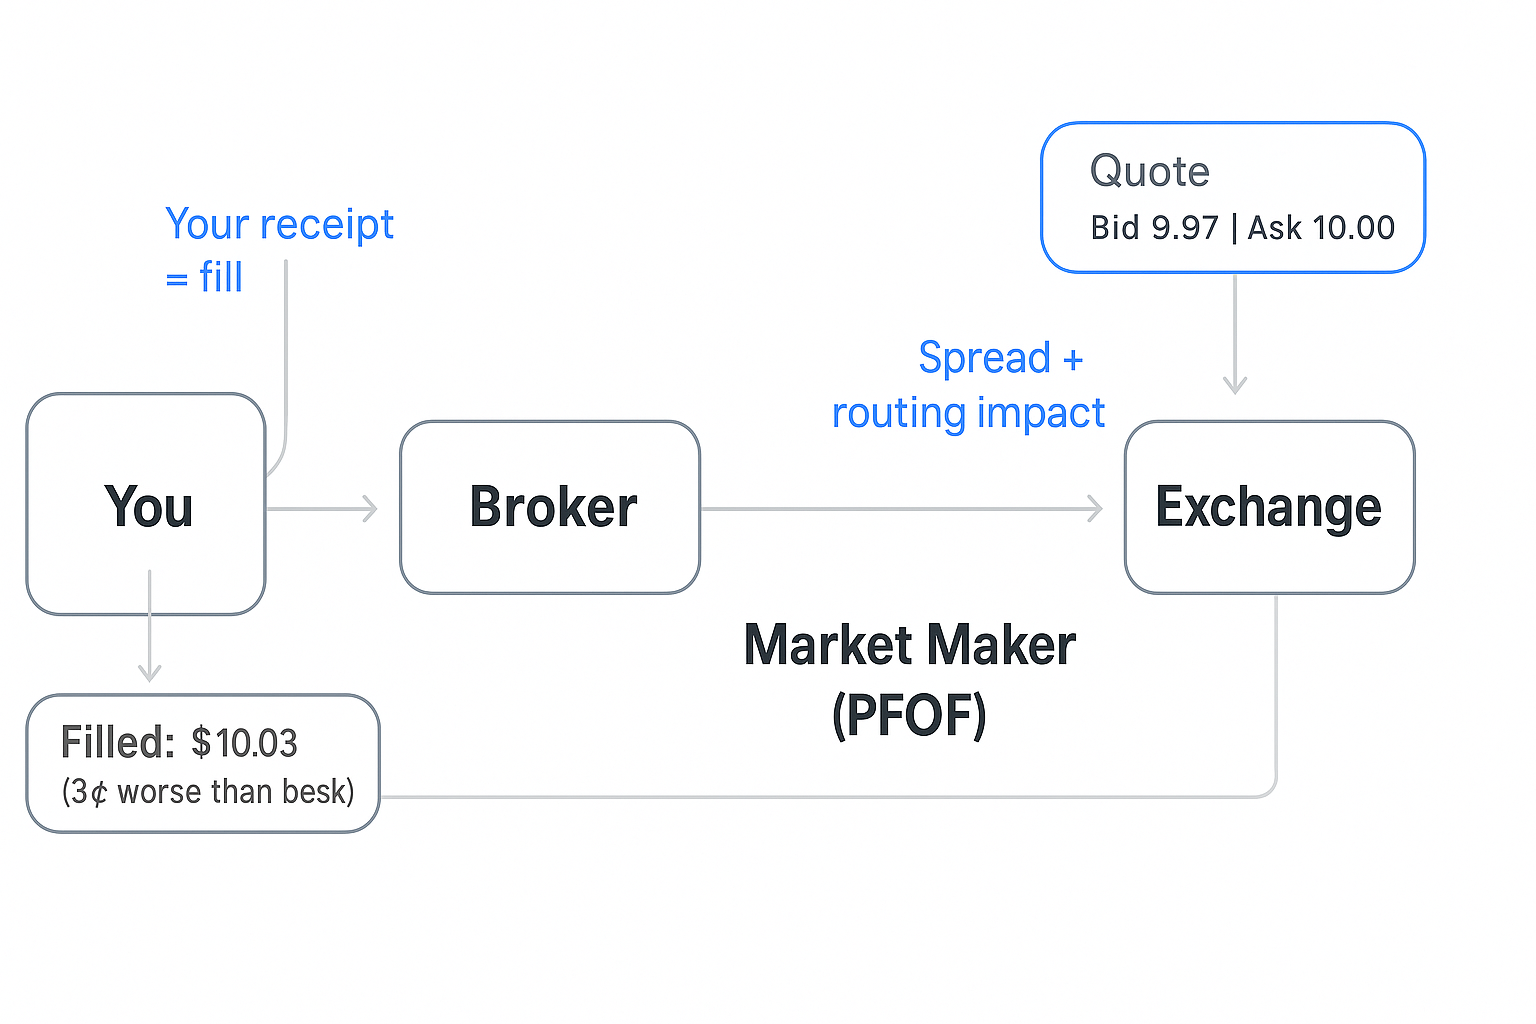
Example: Best ask $10.00; you get $10.03 → that 3¢ difference is real if it repeats. - Payment for Order Flow (PFOF): Market makers may pay brokers to route your order to them. It helps fund $0 commissions and can nudge your fill.
Quick example: Two apps show $10.00; one fills at $10.03, routing/speed can explain the gap. - Market vs. Limit: Market = “fill me now at the best price.” Limit = “fill me at this price or better.”
Rule of thumb: Tight spread & high volume? Market can be fine. Wide spread or after hours? Use a limit. - Fractional shares: Buy a slice (e.g., $10 of Apple) and get proportional dividends/price moves.
Why beginners love it: You can start small and diversify sooner.
Good-to-Know Later (skim and move on)
- Paper trading: A simulated account that mirrors prices so you can practice mechanics + emotions with no real money.
- Margin: Borrow to buy more; it magnifies gains and losses. Keep it off until you have rules.
- APY: Interest paid on idle cash; often higher with paid tiers.
- Cash sweep / FDIC: Uninvested cash can be moved to partner banks to expand FDIC coverage.
- OTC:L Stocks outside major exchanges; often riskier, less liquid, wider spreads.
- Short selling: Sell borrowed shares now, hope to buy back cheaper later; if price rises, losses grow.
Pro tip: If a term feels slippery, screenshot it and write your own one-line definition. If you can’t explain it simply, you probably shouldn’t trade it yet.
What Are the Real Costs of a ‘$0’ Trade?
Think of a currency exchange booth at the airport. They advertise ‘No Commission!’ but make their money on the gap between the ‘buy’ and ‘sell’ price. Commission-free trading works the same way. The real cost is hidden in the spread and your final fill price, a system funded by something called Payment for Order Flow (PFOF).
For anyone comparing Robinhood vs Webull for beginners, these fee differences matter more than headline “$0 commissions.”
“$0 commission” drew me in too.
Then I checked my confirmations and saw my fills weren’t always close to the quote. This is the real cost of commission-free trading.
Defined in one line: Payment for Order Flow (PFOF) means a market maker pays your broker to route orders to them, which helps fund commission-free trading but can affect your fill. (PFOF explained: who pays whom for routing, and why it matters to fills.)
With PFOF, a broker can route your order to a market maker that pays them.
Your order still executes, but your real cost isn’t a fee; it’s embedded in the final price you get.
Think of it like a currency exchange booth at the airport. They advertise ‘No Commission!‘ in big letters. But you know the real cost is in the ‘buy’ and ‘sell’ rates they offer. The gap between those two numbers, the spread, is how they make their money. PFOF works in a similar vein; the cost isn’t a line-item fee, but it’s embedded in the final price you get.
Also watch spreads, tiny pass-through fees, and later transfer-out fees if you move your account.
As Investor.gov explains, your total cost depends on where and how your order is executed, not just the posted commission.
If you want the math behind spreads and execution in plain English, I break it down step-by-step in Part 2 (we’ll compare a real quote vs. a real fill and do the easy subtraction together).
What I changed: I started screenshotting quotes and then checking my fills later. If the gap kept showing up, I switched to limit orders on that stock and stopped trading it after hours unless I had a clear reason.
Key Takeaway:
- Focus on spread, execution, and tiny fees. That’s the true cost picture.
- Pro tip: Screenshot a few fills and compare them to the quote you saw. Patterns jump out fast.
Tiny differences at the fill level become big differences over time.
Who Are These Apps Really For, and Which Fits How We Learn?
After a week of switching back and forth, a pattern clicked: one feels like a friendly on-ramp; the other like a full dashboard.
Neither is “right” or “wrong.” It’s about how we learn.
Robinhood: The “Automatic” Car for Simple Starts
Robinhood felt like shifting into Drive.
Screens are calm, fractional shares are easy, and I could act on small amounts without extra settings.
I loved buying $5–$10 of a familiar company while making coffee.
Those tiny buys mattered, the routine kept me showing up.
It also offers crypto in-app, extended hours, IRAs with a match, and a cash sweep that can expand FDIC coverage via partner banks.
The trade-off for that clean feel is fewer advanced tools on screen.
Summary: Is Robinhood good for beginners?
A: In the Robinhood vs Webull for beginners matchup, Robinhood fits clarity-first starters who want fractionals and a calm screen.
Key Takeaway
- Prefer calm screens, fractionals up front, and a light learning curve? Robinhood fits.
- For our Clarity-First Starters: Start with one broad ETF or one familiar stock, then add slowly.
Starter move (Clarity-First):
- Automate a small weekly buy into one broad ETF or one familiar stock (fractional is fine).
- Add a 24-hour rule: any trade not in your plan waits a day.
Webull: The “Manual Sports Car” for Curious Learners
Webull gave me more control: deeper charts, lots of indicators, screeners, and conditional orders like OCO/OTOCO.
It also supports short selling (availability applies), 500+ OTC names, and futures/commodities via its ecosystem.
My first hour, I toggled too many panels and felt overwhelmed.
Hiding almost everything and practicing one rule changed everything.
Plain answer: Is Webull good for beginners?
A: Within Robinhood vs Webull for beginners, Webull fits tools-first learners who value paper trading and advanced orders
Key Takeaway
- Love hands-on learning, testing rules, and advanced orders? Webull fits.
- For Tools-First Starters: Start in paper trading with one rule (e.g., buy on payday, OCO exit). Add tools gradually as they prove useful.
Starter move (Tools-First):
- Do two paper-trading runs of one simple rule (e.g., buy on payday, OCO exit).
- Turn off most indicators, keep one (like a moving average), and add tools one at a time as you prove they help.
After a week of switching back and forth on my test, a pattern showed up: one feels like a friendly road, and the other like a full dashboard. Control is only useful after you prove your rule. So, practice first.
Quick reassurance: Both firms operate under U.S. brokerage regulations and publish risk disclosures. That doesn’t remove risk, but it’s a reminder to learn the rules before you add complexity.
What You Can Buy?: comparing Robinhood vs Webull for beginners
The Essentials: Stocks, ETFs, Options, and Fractional Shares
Both apps offer U.S. stocks, ETFs, options, and fractional shares.
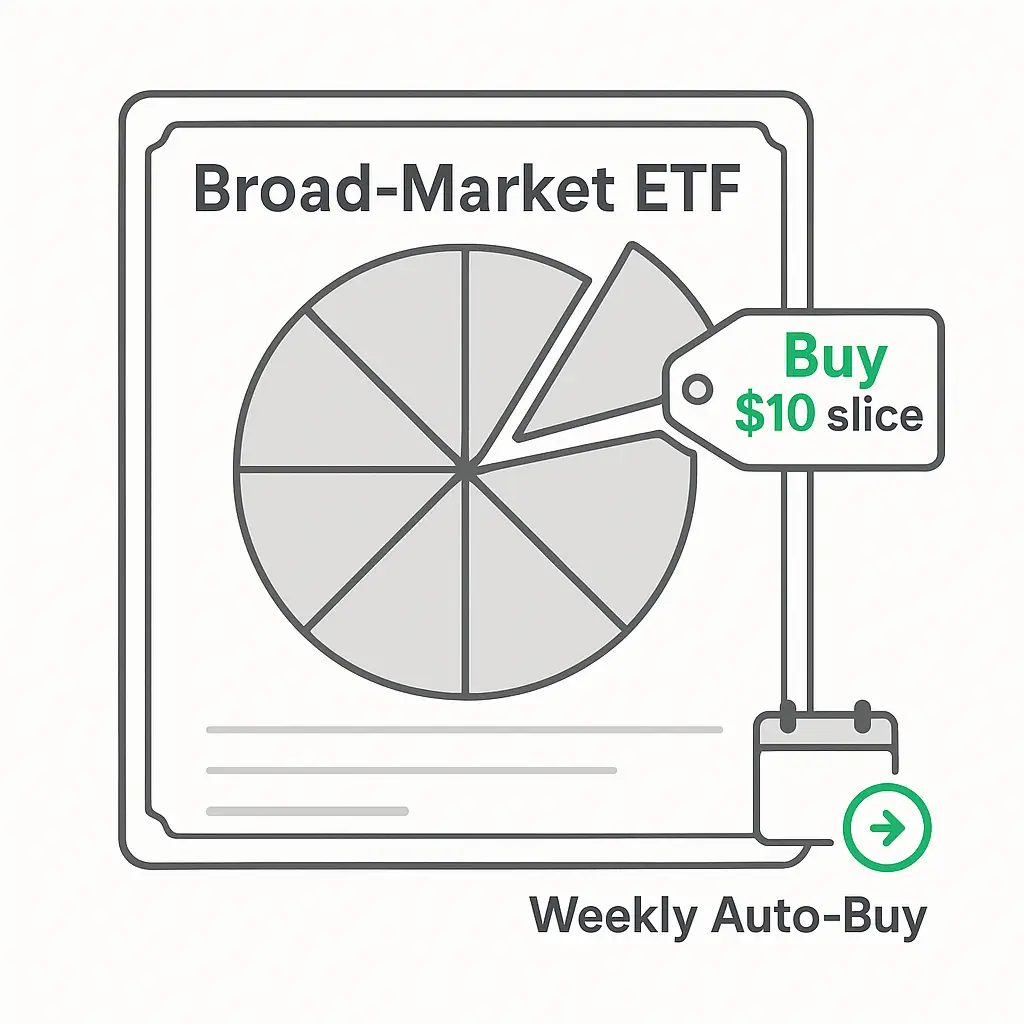
Fractionals are like pizza: you don’t need the whole pie to start.
Buying $10 of Apple still means owning a slice. Dividends and price moves scale down proportionally.
Beginning with a broad ETF kept me from over-trading while I learned the buttons.
What fractionals solve: They remove the “I can’t afford a full share” blocker and let new investors diversify with small dollars from day one.
Key Takeaway
- Fractionals make starting small and diversifying early much easier.
- For our Starters:: Automate a small recurring buy to build the habit before you chase complexity.
What finally clicked for me: My first $10 into a broad ETF mattered less for growth and more for habit.
Three weeks later, the repetition mattered more than any single pick.
For starters: Pick one habit to win this month (auto-buy or weekly review), not both. Add the second once the first sticks.
Key Differences Early On: Crypto, OTC, Futures, Shorting, and Order Types
- Crypto access
- Robinhood: crypto inside the main app (+ web3 wallet)
- Webull: crypto via Webull Pay (often around a 1% markup)
When to prefer which: - Want everything in one app and you’re fine with a simple crypto experience? Robinhood.
- Want more market tools and don’t mind a separate crypto flow or typical ~1% markup? Webull.
- OTC access
- Webull: 500+ OTC securities • Robinhood: limited OTC
Flea market vs. supermarket: OTC can be interesting but less predictable: wider spreads, thinner liquidity, and harder fills.
Beginner nudge: If you don’t know why you need OTC, you probably don’t. Stick to major exchanges at first.
- Webull: 500+ OTC securities • Robinhood: limited OTC
- Futures/commodities
- Webull: offers access via ecosystem • Robinhood: doesn’t emphasize futures
- Short selling
- Webull: supports (availability/eligibility applies)
Borrow-sell-buy back: if price rises, losses can pile up. This is not a beginner move.
- Webull: supports (availability/eligibility applies)
- Conditional orders & tools
- Webull: broader set (e.g., OCO/OTOCO)
Thermostat rules: set a profit target and a stop; when one triggers, the other cancels. Practice first.
- Webull: broader set (e.g., OCO/OTOCO)
- Extended hours
- Robinhood: extended trading windows on many stocks
Late-night shopping: lower volume, wider spreads. If you don’t have a reason to trade then, it’s okay to skip.
I almost chased a spike after hours, waiting until morning saved me from a worse fill.
If you’re not sure why you’re trading off-hours, it’s usually safer to wait for the main session.
Rule I follow: If I can’t explain why an after-hours fill is better than tomorrow’s open, I wait and use a limit during the regular session.
- Robinhood: extended trading windows on many stocks
Bulleted Micro-Summary
- 🔐 Crypto: Robinhood in-app • Webull via Webull Pay
- 🧰 Controls: Webull broader • Robinhood simpler
- 🏷️ OTC: Webull 500+ • Robinhood limited
- ⛽ Futures: Webull yes • Robinhood no
Quick Answers (for common searches)
- Robinhood vs. Webull fees: Both offer commission-free trading; your real costs show up in spreads, execution, and small pass-through fees.
- Which is better for paper trading? Webull; its built-in $100,000 simulator is ideal for first-week practice.
- Which is better for simple long-term investing? Robinhood; it’s designed for fractional, set-and-forget starts.
Robinhood vs Webull for beginners: Paper Trading??
I skipped paper trading because I thought it was “fake.”
Two weeks later, I learned more about me than the market: I kept hitting market on thin names and jumped at every alert.
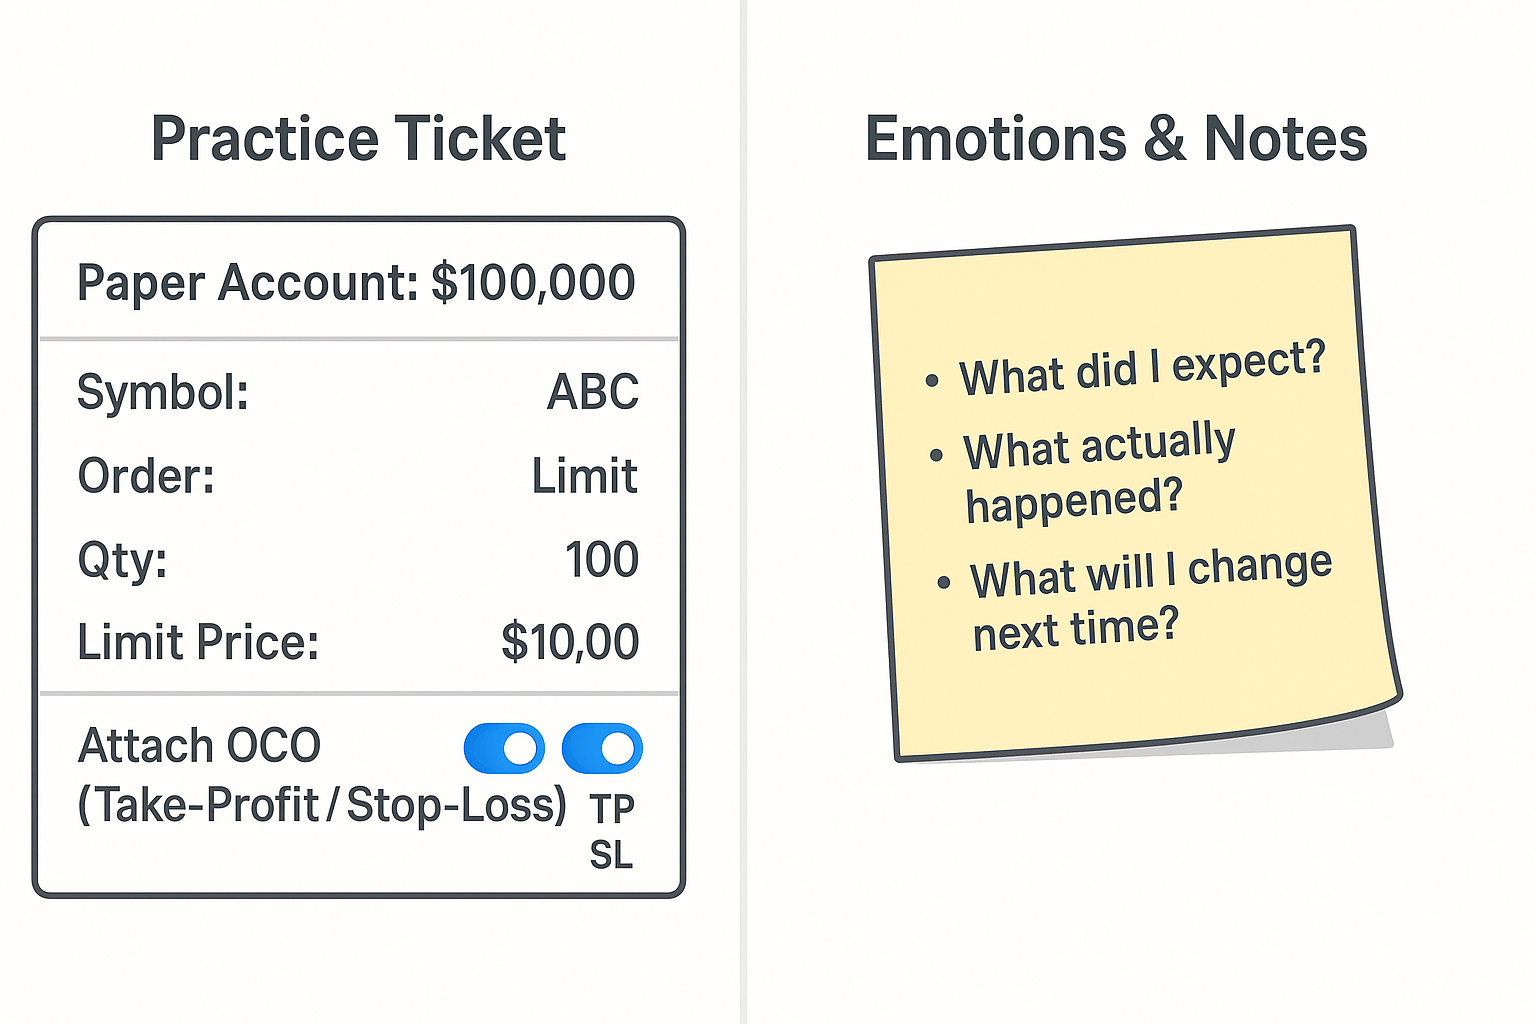
Practicing with a $100,000 virtual account in Webull felt like a flight simulator; same cockpit, real-looking prices, no broken bones.
I treated Webull’s simulator as paper trading for beginners; a no-risk place to practice buttons and emotions.
My first live trades afterward were smaller and calmer because I knew my own triggers.
A Simple Starter Plan
- Week 1: Place three paper trades using limit orders only. Log why, price, and emotion (one line each).
- Week 2: Repeat the same rule with OCO exits (target + stop). Compare fills to Week 1.
- Graduation: If both weeks feel calm, go live with fractional sizes and the same rule.
- Keep notifications minimal; add a 24-hour cooling-off rule for any trade not in your plan.
Surprise benefit: I stopped checking quotes every 5 minutes.
Once I turned alerts down, I made fewer impulse taps.
What to avoid in practice mode: Chasing thin, hyped tickers or turning on five indicators at once. Practice one rule, one size, one time window. Simplicity reveals what actually helps.
Key Takeaway
- Paper trading teaches the buttons and your biases before money is at risk.
- For starters: Treat wins and losses like notes, not scores. You’re practicing, not proving.
Paper trading and clean defaults pull in different directions in Robinhood vs Webull for beginners.
Quick First-Setup Checklist (Do This Before Part 2)
Your first 30 days (simple plan): One auto-deposit, one fractional ETF, one weekly review, and no new features until that rhythm feels easy.
- Disable margin and options until you intentionally enable them later.
- Set price alerts to “important only” (no buzzing for tiny moves).
- Open your account and turn on 2-factor authentication (2FA).
- Set a small recurring deposit (an amount you won’t miss).
- Pick one broad ETF or one familiar company (fractionals are fine).
- Write a one-page plan (goal, contribution schedule, target mix, rebalance rule).
- Tools-First? Run your plan in paper trading twice before any live trade.
(My current routine: tiny weekly auto-deposit, a fractional slice of a broad ETF, and a 15-minute Sunday money check-in. Nothing fancy. Just repeatable.)
Say Hi to Part 2
We’ve covered the feel of each app, what you can buy, and how to practice safely.
In Part 2, we’ll follow the money in detail: where costs show up (spreads, execution, pass-through fees), how to tell if a paid tier is worth it for your cash APY, what margin changes about risk, what regulators have flagged, and the three mistakes I’m actively trying to avoid.
Bring your quiz result (Clarity-First or Tools-First), your one-page plan, and one recent trade confirmation. We’ll use them in Part 2 to do real, bite-size math together. By the end of Part 2, you’ll have a clear yes/no on whether paid tiers or margin belong in your plan and why.
Full Glossary Notes
Paper trading: Place real-looking orders, see hypothetical fills, and track pretend P/L without moving cash. Treat it as training wheels; real fills can differ, so don’t expect the same results live.
Margin: A credit line from your broker secured by your portfolio. Great when trends cooperate; brutal when they don’t. Know the term margin call before toggling it on.
APY: Annualized yield on idle cash. Paid tiers may boost it, but do the breakeven math on the subscription fee vs. your average balance.
Cash sweep & FDIC: Your uninvested cash may be distributed across multiple partner banks to increase FDIC insurance. Check the bank list and your aggregate coverage.
OTC: Outside NYSE/Nasdaq. Often thin volume and wider spreads; orders may fill slowly or not at all. Beginners usually stick to major exchanges first.
Short selling: You borrow shares, sell them now, and hope to repurchase lower later. If the stock rises, losses can be uncapped. Not beginner-friendly; practice in a simulator first.
Part 2: Costs, Tiers, Risks & Decision
You are here: Stop 2 of 2
Welcome to Stop 2 of 2! We’ve covered the setup, and now we’re following the money to make our final choice.
What we’ll cover now: real costs behind “$0,” paid tiers & APY, margin math, regulatory notes, common mistakes (with fixes), a clear decision, and a short FAQ, all from our Robinhood vs Webull for Beginners lens.
Author’s Note (how I’m approaching this)
I’m not an expert. I’m a fellow beginner who tests with small amounts, practices risky features in a simulator first, and double-checks details in official docs. I don’t take referral fees for this comparison. When something confuses me, I say so and translate it into plain English. I reviewed each app’s public help pages the week of August 5, 2025 and saved screenshots. My promise: clear explanations, beginner-safe steps, and no hype. If I learn something new, I’ll update this and explain what changed.
Last reviewed: August 9, 2025.
Hello again! Investi-Buddy here. In Part 1, we matched each app to how we learn: Robinhood felt like an automatic car for calm starts, while Webull felt like a manual sports car for hands-on explorers.
We used fractional shares to start small, we practiced in paper trading to learn the buttons and emotions, and we wrote a one-page plan so impulse taps don’t run the show.
Now I want us to follow the money together using spreads, execution, APY, and margin, so we can choose with confidence. (If you missed the setup, you can read Part link goes on “Part 1.” Let’s pick up right where we left off.)
Pre-Quiz (Part 2): What costs will matter most for us?
Let’s answer quickly and keep our A’s/B’s. We’ll reference this Cost Lens as we go.
- How often do you place trades right now?
A) A few per month B) Several per week - How much idle cash do you typically keep in your brokerage?
A) <$500 most of the time B) >$2,000 fairly often - What’s your stance on borrowing (margin) for now?
A) Not planning to borrow B) Might borrow a small amount later
Our Cost Lens
- Mostly A’s → Low Sensitivity (for now): let’s focus on execution basics and avoid over-trading.
- Mostly B’s → High Sensitivity: let’s watch spreads, do the APY math, and price margin carefulwahly.
“Our fill price is the real price.”
Where do the real costs hide and how do we keep them small?
If commissions are free, what costs still show up?
So, the next thing I tried to figure out was why $0 trades can still cost us money. With payment for order flow (PFOF), market makers pay a broker to route orders on their way. That helps fund $0 commissions, which sounds great.
However, I kept noticing that our all-in cost still includes:
- Spread: the gap between bid and ask
- Execution: how close our fill is to the best available price
- Pass-through fees :tiny regulatory/venue charges
Remember, when we compare Robinhood vs Webull, execution quality on small orders can outweigh tiny fee differences.
Quick note: these pass-through fees show up as fractions of a cent: small on their own, but they can add up if we trade a lot.
During my 30-day test, my trade log was my best friend. After each trade, I pressed ‘Order Details’ and pressed down the fill price next to the quote I saw “Small execution differences add up when we trade often.”
Mini-Calculator Analogy
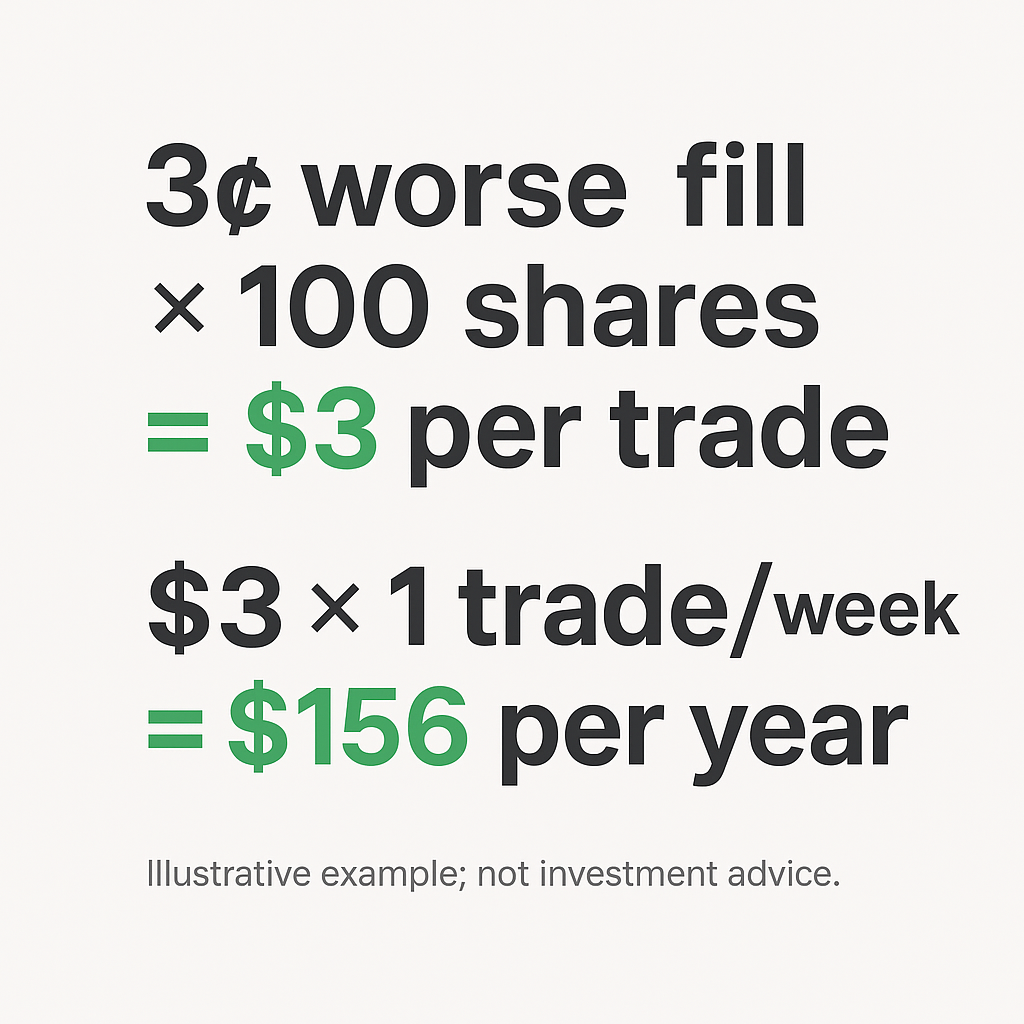
Here’s where it gets a little tricky for us. If our fills are 3¢ worse than the best price on 100 shares, that’s $3 per trade. If we do that weekly, it’s ~$156/year, which is basically a nice dinner or a few subscriptions. We feel it more when we trade more.
Two-click self-audit I use (30 seconds)
- After a trade, I press Order Details and note the fill.
- I compare it to the quote I saw. In my notes app, I write +0.01, +0.03, etc.
After four weeks, I know whether I should use limit orders more often.
For our Low-Sensitivity (A’s) investors:
- Low Sensitivity (A’s): Let’s use limit orders on thin names and avoid after-hours unless we have a clear reason.
- High Sensitivity (B’s): Let’s screenshot the quote and compare it to our fill weekly; if gaps keep showing up, we tighten to limits and avoid low-liquidity windows.
Bulleted Micro-Summary
- Spread is a built-in cost.
- Execution is our actual price.
- Fees are tiny, but they stack with activity.
The Bottom Line
Let’s watch our fill more than the $0 badge. Tiny gaps can compound into real money if we’re active.
Here’s something I wish I’d known earlier: if we can’t explain why we’re trading after hours, we’re usually better off waiting for the regular session and using a limit. Makes sense, right?
The most important price isn’t the $0 commission; it’s the final fill price in my trade confirmation. That’s the real cost, and it’s what WE need to watch.
With the real costs in view, I wanted to see if paid tiers actually pay for themselves.
Robinhood vs Webull for beginners: Paid Tiers & Cash APY?
When I looked in respect to Robinhood vs Webull for Beginners, paid tiers felt like membership plans. Both apps pay cash interest (APY) on idle cash, but the higher rates usually require a subscription.
- Robinhood Gold: higher APY, larger instant deposits, research; the cash sweep can expand FDIC coverage via partner banks.
- Webull Premium: competitive APY, data upgrades, margin rate discounts; the lower monthly fee can make breakeven easier at smaller balances.
So, Idle-cash APY is an underrated tie-breaker in Robinhood vs Webull for beginners.
Quick math
If the tier costs $50/year and lifts APY by 3 percentage points vs. the free tier, we’d need about $1,700 of average idle cash to cover the fee with extra interest.
Analogy of APY Membership Math
I think about it like a store membership that boosts our “cash-back” on idle cash.
- With $1,000 idle and a 3% uplift → ~$30/year (under a $50 fee).
- With $2,000 → ~$60/year ($10 ahead).
- With $5,000 → ~$150/year ($100 ahead after the fee).
Same membership, different value, it just depends on our balance.

A tiny guardrail I use (so I don’t fool myself)
I keep a note that says: Extra Interest – Annual Fee = Keep or Cancel?
I re-check quarterly using average cash (not the best week).
Cost Lens call-back
- Low Sensitivity (A’s): With little idle cash, a tier may not pay yet.
- High Sensitivity (B’s): If we hold cash or use the extras, we can redo this breakeven each quarter.
- High idle cash? APY can out-earn the fee.
- Use the extras? Value grows beyond APY.
- Low idle cash? Probably skip for now.
When Tiers Make Sense
The Bottom Line
Let’s upgrade when our cash balance (and actual usage) beats the fee by a comfortable margin.
One small habit that helps us stay honest: if our cash balance swings a lot, we set a monthly reminder to check our average, not our peak.
Since fees are only half the story, the next thing I checked was borrowing costs.
Which app is cheaper if we ever use margin?
I’ll be honest. I avoided margin at first because the risks felt abstract. Once I did the math, it clicked. If we don’t plan to borrow, we can skim this. If we do, pricing matters.
- Robinhood: Gold members get the first $1,000 of margin at 0%.
- Webull: tiered rates can be higher at small balances but competitive at larger ones, especially with Premium.
Relatable picture: margin is a credit line backed by our investments. Thus, it’s useful when we’re disciplined, unforgiving when prices drop.
Daily Cost of Borrowing
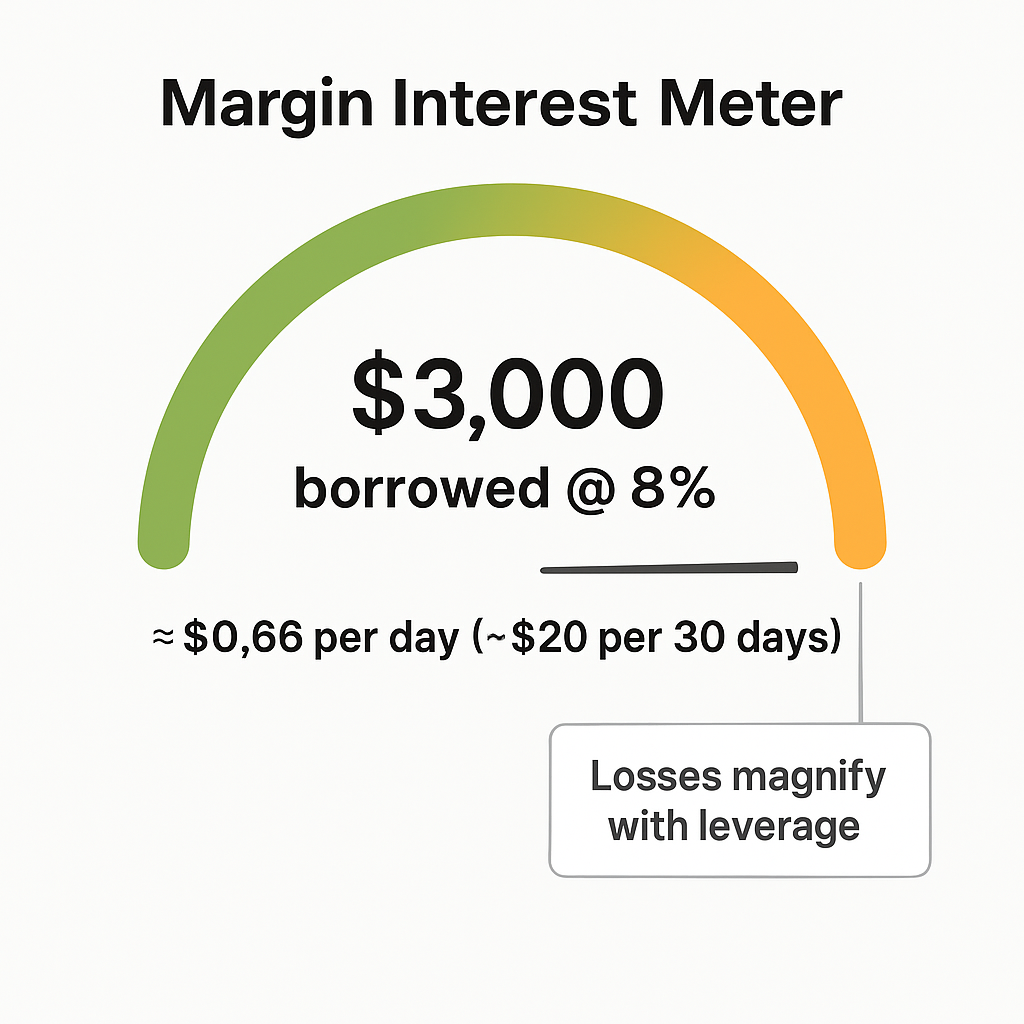
Let’s say I borrow $3,000 at 8% for a month:
- That’s roughly $0.66/day ($3,000 × 0.08 ÷ 365), or about $20 in 30 days.
- If our position dips 2% on $3,000, that’s ~$60 down plus the interest.
Using margin is like adding a turbocharger to your car. When you’re on a straight, open road, the acceleration is awesome. But if you hit an unexpected sharp turn or a patch of ice, that extra power dramatically magnifies your loss of control. The interest is the fuel that turbo is constantly burning, even when you’re just idling at a red light.
My two rules (they keep me calm)
- If I can’t write the risk in one sentence, I don’t borrow.
- If I do borrow, I set OCO exits the moment I enter.
Cost Lens call-back
- Low Sensitivity (A’s): Let’s keep margin off until we can explain the risk in one sentence.
- High Sensitivity (B’s): If we test it, we start tiny, use OCO exits, and track the interest like a bill.
What to do with Margins
- Do: Borrow small, set exits, review interest.
- Don’t: Borrow because it’s available or after a hot streak.
The Bottom Line
Borrowing magnifies outcomes. If we wouldn’t take that bank loan, we should think twice about the broker one.
Here’s something I learned the hard way: when I’m tempted to “just try” margin, I first paper-trade the same idea and pretend the interest is real. It becomes obvious fast whether it holds up.
After the math, I wanted us to peek at track records so we’re not surprised later.
Peeking at the Track Records… What I Found for Us
Okay, I’ll be honest, this next part felt like doing a bit of homework. I decided to read through some of the public reports from regulators like the SEC and FINRA because I figured if we’re going to trust an app with our money, we should know its history.
At first, the legal language was a little intimidating. But I quickly realized these reports aren’t just about fines; they’re like a free instruction manual on what pitfalls to avoid as beginners. So, let’s look at the key lessons I pulled out for us, in plain English.
The Lesson I Took from Robinhood’s Reports
As I read about Robinhood, two things kept coming up: discussion around “best execution” (which is about the price we actually get) and platform outages that happened during really busy trading days.
- The ‘aha!’ moment for us: The second I read about outages, it clicked why so many experienced investors are passionate about limit orders. So, here’s our protective takeaway from this: It’s the #1 reason for us to master using limit orders. A limit order is our way of telling the app, “Hey, I don’t want to pay a penny more than this exact price.” It becomes our personal safety net if the app ever gets laggy or the market goes wild.
The Lesson I Took from Webull’s Reports
When I looked into Webull, a different theme appeared. I saw notes about how some newer investors were sometimes approved for complex tools, like options, a bit too quickly.
- The ‘aha!’ moment for us: This was a discovery for me. It exactly told me why Webull’s paper trading feature is so important. It’s not just for practicing buttons; it’s for protecting our real money.
Here’s our takeaway: Just because a powerful tool is available doesn’t mean we have to use it right away. This is our reminder to always practice a new strategy in the simulator first. If we can’t explain the risk in one simple sentence, we probably shouldn’t be trading it yet.
My Takeaway from All This:
Honestly, after going through those reports, I didn’t feel scared. I felt more prepared. The main lesson I learned for both apps was exactly the same: Our safest path is to build confidence with the simple tools first. If we stick to using limit orders and practicing new ideas in a simulator, we’re already sidestepping the biggest issues mentioned in these reports. We’re building good habits right from the start.
With that context, I wanted a plan to avoid the classic beginner mistakes.
My Three Golden Rules for Safer Beginner Investing
Over my first few months, I noticed my worst decisions came from excitement, noise, or a rush. Thus, I wrote three rules that I should review before I even think about placing a trade.
Rule 1 — My plan is the boss, not the app
Why this works: apps nudge; written plans calm us down.
Do this now:
- Turn off “most traded” and price-movement push alerts.
- Pin your watchlist and hide “trending” lists.
- Add a 24-hour cool-off for any idea not already in your plan.
- Require trade confirmations and two-step approval.
My fix: my one-page plan is the only thing that dictates a trade.
Rule 2 — I don’t trade what I can’t explain
Why this works: if I can’t teach the risk/reward in two minutes without notes, I’m not ready to risk real money.
Do this now:
- Give every idea the 2-minute explain test (risk + payoff + exit).
- Paper-trade first. If it behaves, start tiny and review the outcome.
My fix: simulate first or skip it.
Rule 3 — I’m an investor, not a day-trader
Why this works: consistency beats tap count.
Do this now:
- Automate contributions (DCA).
- Set allocation bands and a simple rebalance rule (e.g., quarterly).
- Track consistency with your plan, not trade frequency.
My fix: routine > impulse.
Quick Take
Placement: small callout box under Rule 3 or after the intro
“Start small, write it down, and let time do the heavy lifting.”
Day-one defaults I flip
- ☐ Turn off most-traded and price-movement alerts
- ☐ Enable trade confirmations and two-step approval
- ☐ Pin the watchlist; hide trending lists
Guardrails that help us
- Automate contributions
- Paper-trade new ideas
- Add a cool-off rule
Author note (E-E-A-T): I’m documenting exactly what I use as a beginner so others in the same boat can copy what’s useful and ignore what isn’t.
Not financial advice.
Last updated: 9 August, 2025
We’ve looked at the costs, the risks, and the rules. Now, let’s make our decision with confidence.
Robinhood vs Webull for beginners: Final Decision
Bottom line for Robinhood vs Webull for beginners:
Choose Robinhood if you want the simplest fractional start; choose Webull if you want tools and paper trading from day one.
Two-week trial plan (so that we feel it, not just read it)
- Week 1: Robinhood: we fund $100–$300, buy fractionals of a broad ETF + one familiar stock; we use limit orders only. We log fills in our Execution Log.
- Week 2 : Webull: we mirror the same trades in paper trading, test OCO on a tiny position, and compare charting and order control.
At the end, we choose the one that made us feel calm, clear, and consistent.
Beginner Decision Matrix
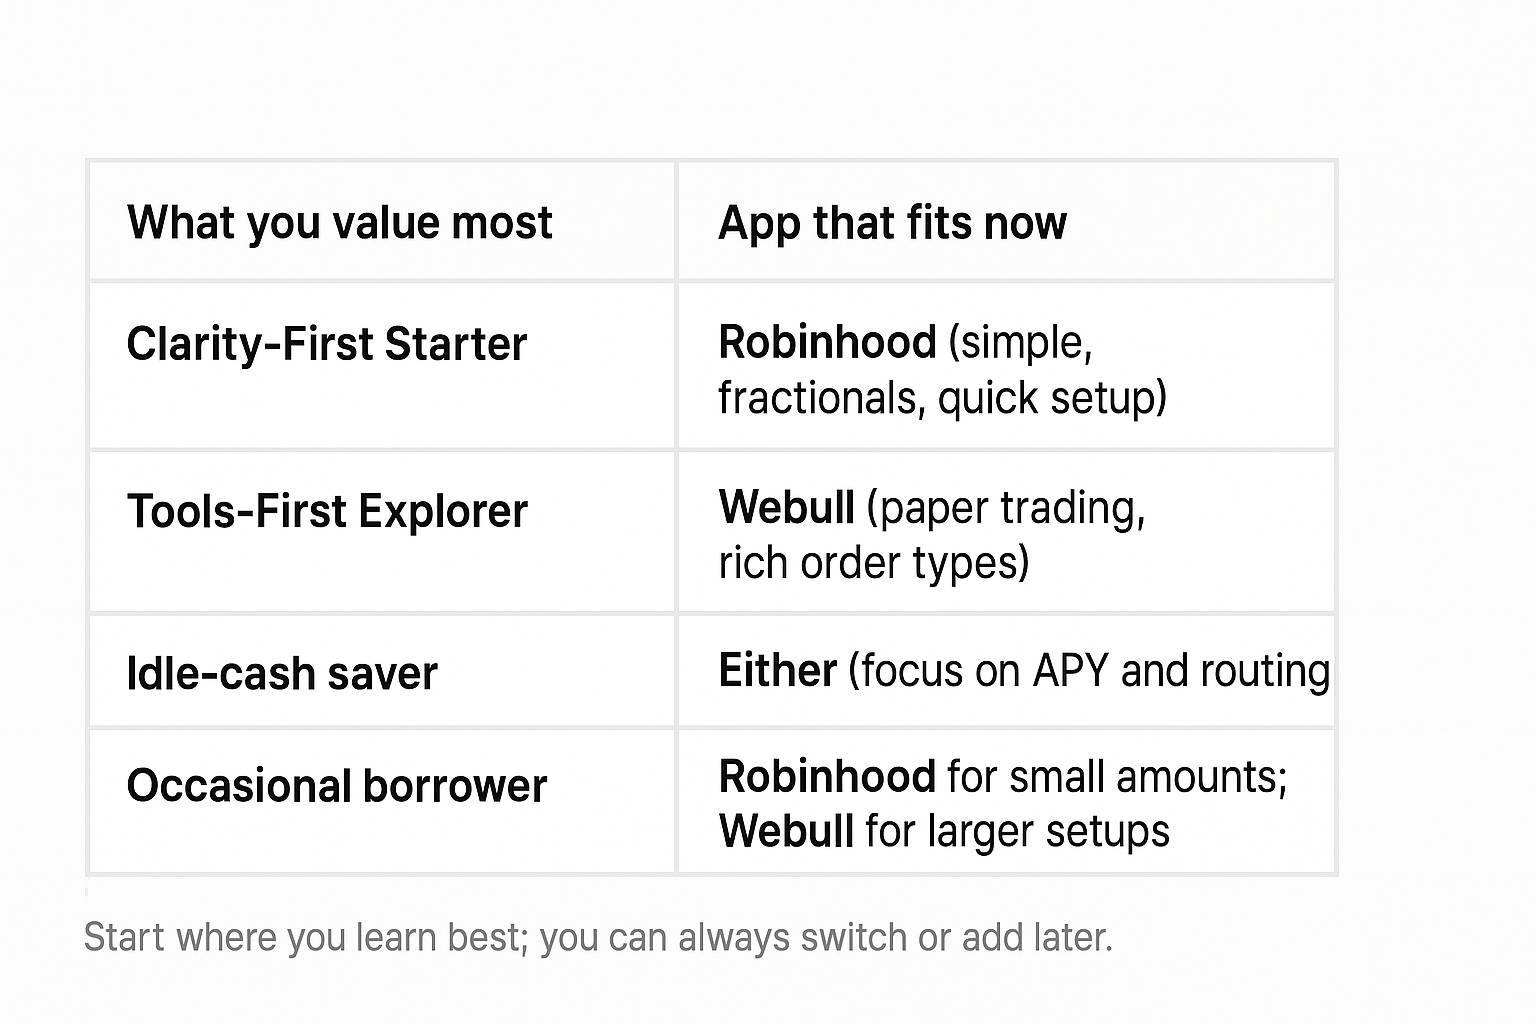
| If this sounds like you… | What you’ll likely value most | App that usually fits now |
|---|---|---|
| Clarity-first starter (few trades, small cash) | Simple layout, easy fractionals, limits | Robinhood |
| Tools-first explorer (practice first) | Paper trading, order types, charts | Webull |
| Idle-cash saver (>$2k often) | Higher APY via paid tier | Either (run the math) |
| Occasional borrower | 0% first $1k or tiered discounts | Robinhood (light borrow) / Webull (larger) |
The short version
- ✅ Choose Robinhood if we want a clean, simple experience, fractional shares up front, integrated crypto, extended hours, and long-term features like an IRA match and a high-APY cash sweep (expanded FDIC via partner banks).
- ✅ Choose Webull if we want more tools from day one. It offer deep charts, more order types, short selling, OTC/futures access, and paper trading with $100,000 virtual cash to learn safely.
Costs to keep in mind
- 🧾 Even with $0 commissions, we still face spreads, execution differences, and pass-through fees.
- 💱 Crypto trades can include markups/spreads we won’t see as a line item.
- 🔁 Transfer-out fees (e.g., $75–$100) can apply when we move accounts.
- 📅 Cash APYs and margin rates change; we re-check quarterly and re-run breakeven on any paid tier.
“Pick the app that matches how we learn and grow from there.”
Update Notice: I re-review quarterly so this stays fresh. If you want a nudge when I update Part 2, tell me and I’ll add a quick note at the top next time.
Disclaimer: This article is for informational and educational purposes only and should not be considered financial or investment advice. I am not a financial professional, and this content reflects my own research and learning journey. Investing involves risk, including the possible loss of principal. Always conduct your own research and consult with a qualified financial professional before making any investment decisions.
Sources I Used (APA 7th)
- Commonwealth of Massachusetts Securities Division. (2020). Administrative complaint: In the matter of Robinhood Financial LLC (E-2020-0047).
- U.S. Securities and Exchange Commission. (2020, December 17). Order instituting administrative and cease-and-desist proceedings: In the matter of Robinhood Financial LLC (Release Nos. 33–10906; 34–90694).
- Financial Industry Regulatory Authority. (2021, June 30). FINRA orders record financial penalties against Robinhood Financial LLC.
- Financial Industry Regulatory Authority. (2025a, March 6). Letter of Acceptance, Waiver, and Consent (AWC): Robinhood Financial, LLC / Robinhood Securities, LLC (No. 2019060756501).
- Financial Industry Regulatory Authority. (2025b, March 7). FINRA orders Robinhood Financial to pay $3.75 million in restitution; fines Robinhood Financial and Robinhood Securities.
- Robinhood. (n.d.). Transfer your assets out.
- Robinhood. (n.d.). Brokerage cash sweep program interest rate (APY).
- Robinhood. (n.d.). Brokerage sweep program.
- Robinhood. (n.d.). What’s Robinhood Gold?.
- Webull. (n.d.). Webull Premium.
- Webull. (n.d.). Cash management.
- Webull. (n.d.). Paper trading.
- Webull. (n.d.). Margin trading.
- Webull. (n.d.). OTC stock trading.
Dong Woo is a retail investor and the founder of TheFinSense.io. After feeling overwhelmed by the complexity of modern investing apps himself, Dong Woo founded TheFinSense.io with a single mission: to be the ‘investibuddy’ he wished he’d had. He’s not a licensed advisor, but a meticulous researcher who translates his own hands-on testing and learning journey into clear, safe, and actionable steps for beginners. His work is dedicated to the belief that the best way to build wealth is through consistent habits, not hype.